How to install Webview on Iiyama Displays
This guide will show you where to download a WebView APK file, and how to transfer it to a Iiyama Display.
Make sure to have a USB stick with nothing on it prepared. There should be nothing on the USB, in case that the Iiyama display needs to format it.
To check if the Iiyama display needs to format the USB, follow these steps:
Formatting the USB stick:
1. Head to the Settings App.
Part 1: Downloading the WebView APK File.
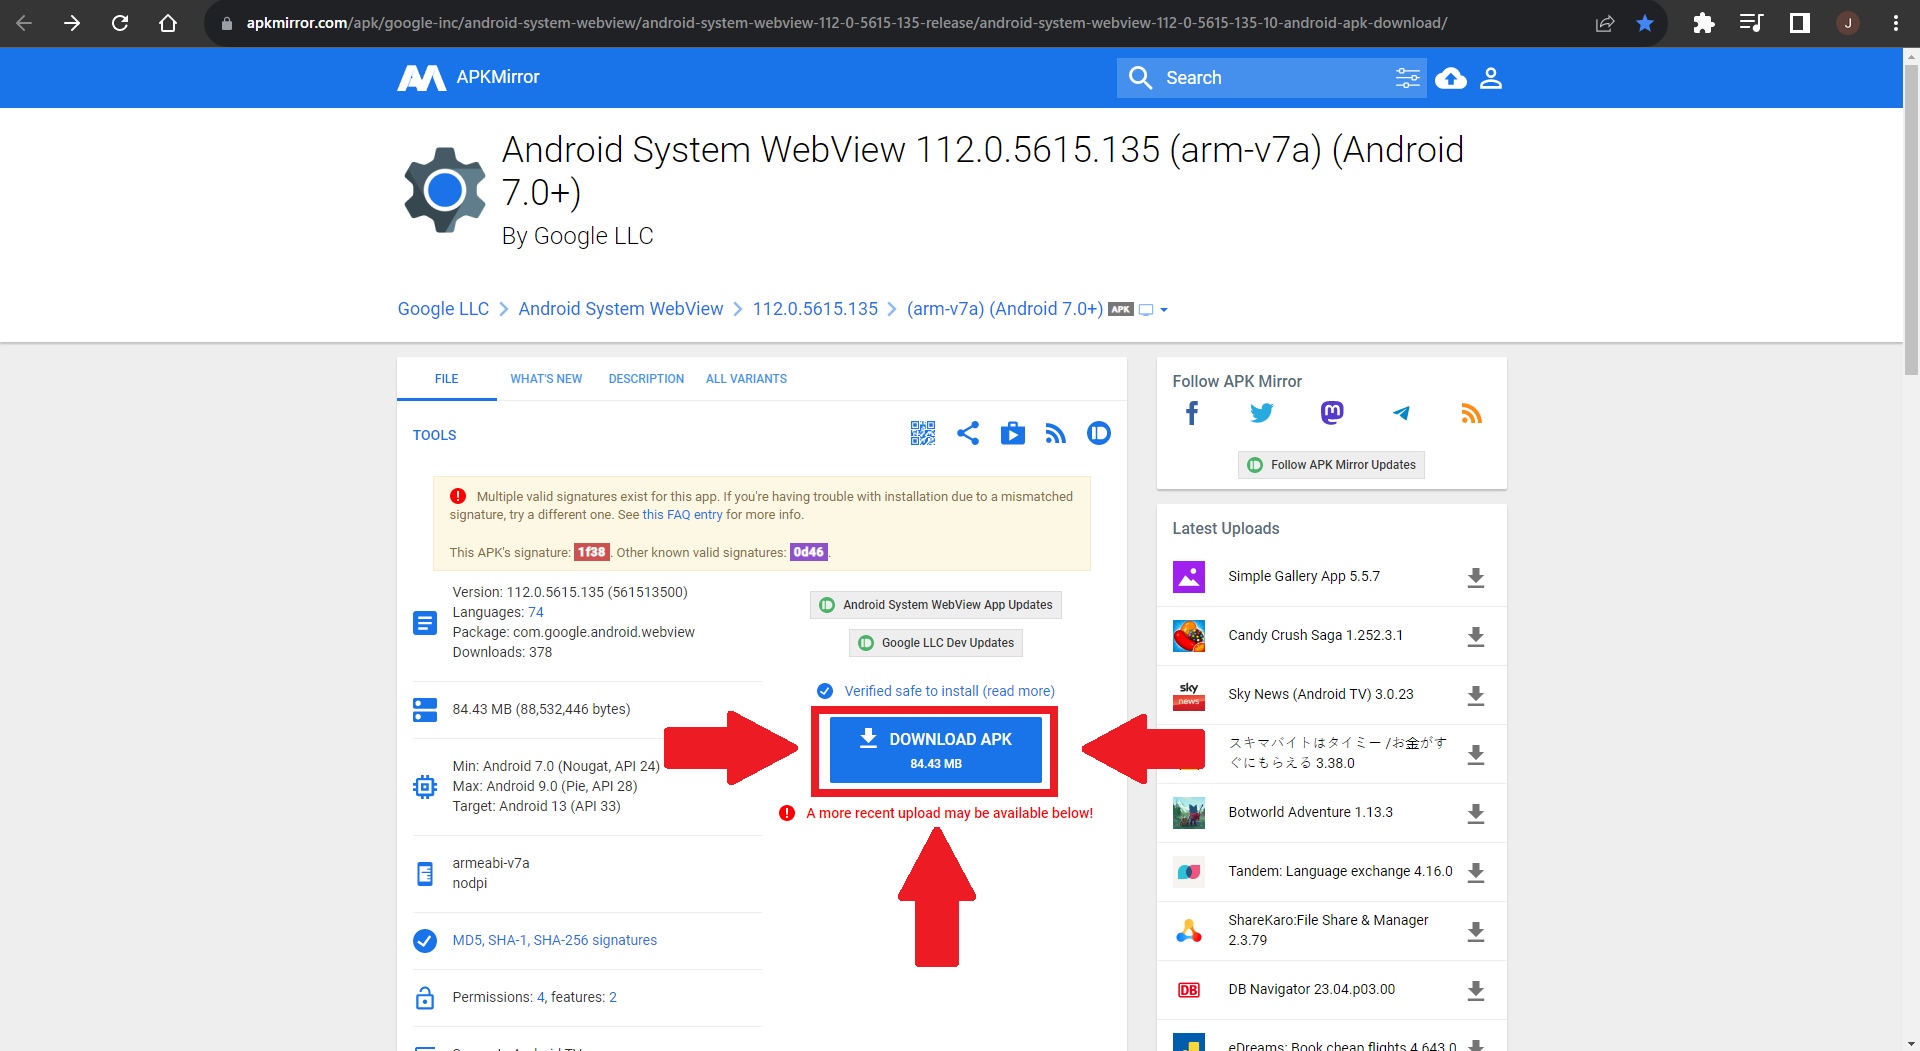
1. Head to this website.
2. Click the big blue button that says Download APK.
!!DO NOT CLICK ANY OTHER DOWNLOAD BUTTONS THAN THE ONE SHOWN IN THE PICTURE!!
3. After a couple of seconds, the file will be downloaded. You can see it being downloaded in the bottom left corner.

4. You can now transfer the APK file to your USB Stick. You can do this using File Explorer.
Part 2: Transfering the file to the Iiyama Display.
1. Plug the USB into the Iiyama Display.
2. Swipe up from the bottom of the screen, and then select the APKInstaller App.
3. In the app, select Install and then USB Memory.
4. On the right side you will now see a file called something like com.google.amdroid.webview_112.0 and so on. Click on that file.
5. A window will now pop up. Press Install in that window.
WebView is now installed!
To get Q-Cal on the device, follow this guide.
To check if the Iiyama display needs to format the USB, follow these steps:
Formatting the USB stick:
1. Head to the Settings App.
2. Click on Storage.
3. If your the Iiyama device says that your USB is corrupt. Select your USB Stick in the menu, and press Set Up. This will delete everything on your USB stick, so backup the files if you wish to save anything on it.
3. If your the Iiyama device says that your USB is corrupt. Select your USB Stick in the menu, and press Set Up. This will delete everything on your USB stick, so backup the files if you wish to save anything on it.
If your USB stick works fine with the device, ignore this step.
After that's done, your USB Stick can now be used to install WebView on.
While you're in the settings, click on Wi-Fi. Here you'll need to set the device with the network you wish.
We recommend using an Ethernet cable if possible, as that would make the device more stable.
Part 1: Downloading the WebView APK File.
1. Head to this website.
2. Click the big blue button that says Download APK.
!!DO NOT CLICK ANY OTHER DOWNLOAD BUTTONS THAN THE ONE SHOWN IN THE PICTURE!!
3. After a couple of seconds, the file will be downloaded. You can see it being downloaded in the bottom left corner.
4. You can now transfer the APK file to your USB Stick. You can do this using File Explorer.
Part 2: Transfering the file to the Iiyama Display.
1. Plug the USB into the Iiyama Display.
2. Swipe up from the bottom of the screen, and then select the APKInstaller App.
3. In the app, select Install and then USB Memory.
4. On the right side you will now see a file called something like com.google.amdroid.webview_112.0 and so on. Click on that file.
5. A window will now pop up. Press Install in that window.
WebView is now installed!
To get Q-Cal on the device, follow this guide.
Related Articles
Setup Q-Cal on Iiyama Displays
This guide will show you where to download Q-Cal, and how to transfer it to a Iiyama Display.* Before you start to download, make sure that the device has WebView installed. If this is not installed, Q-Cal will not run. Follow this guide to install ...How to install Q-Play on an iiyama monitor
This guide describes how to install Q-Play on an Iiyama monitor. NOTE: You need to download the latest Q-Play software and save it on a USB stick. 1. When you start up the monitor, select the language you want. 2. Connect the monitor to either WiFi ...Samsung E-Paper install guide
What is an E-Paper The Samsung Color E-Paper display is an ultra-low-power digital signage screen designed to show full-color content with a paper-like appearance. It uses reflective e-paper technology, allowing images to remain visible with minimal ...Installation - Q-Play on Iiyama - Android 11
Introduction This guide will help you install the Q-Play APK file on your Iiyama screen. By following the step-by-step instructions, you will ensure a smooth setup and optimal use of your screen with Q-Play. The guide is divided into three sections: ...Enable Kiosk mode on your Iiyama TW1025LASC screen
Update screen to enable kiosk mode 1. Download this file: https://iiyama.diskstation.me/api/public/dl/U85jDaxB/ELC_FW/TW1025LASC/TW1025LASC-B1PNR-kiosk.rar 2. Decompress file, should contain 2 files 3. Transfer the file update.zip to a FAT32 ...