Meeting Room Display
Introduction
This guide explains how to add and configure your meeting room displays, as well as how to apply a design to the display,
Prerequisites
Make sure the device is powered on and connected to the internet.
Step-by-Step Guide
1. Add a display
To add a display, navigate to Displays and then select "Meeting Room Display Møderumsskærme". 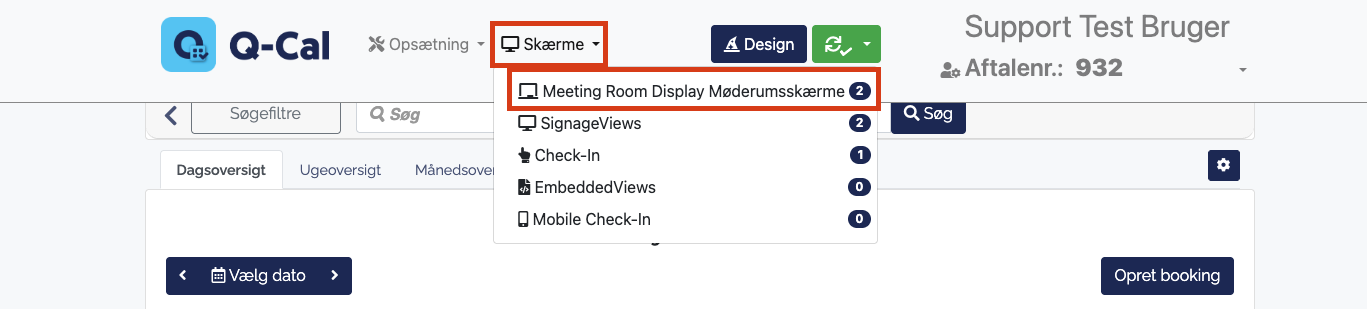
You will now see an overview of the connected devices. If the list is empty, no devices are currently connected.
Click the + button on the right.
Enter the 4-digit connection code displayed on the screen. Ensure that the display is powered on and connected to the internet, then click OK.
2. Select a Design, Name and Heading
Choose a design from the list of available displays designs. It is recommended to create your display designs before configuring the display.
Next, give the display an appropriate name.
Optionally, assign the display to a display group.
Enter a heading for the display. This heading will be shown on the meeting room display.
3. Calendar Content
To display bookings, the display must be linked to a calendar.
Select the appropriate calendar from the list.
4. Advanced settings
You can configure the following advanced settings:
- Show Puplic Only: Displays only bookings where Show on Overview Display is enabled.
- Display Refresh Rate: Choose how often the display should refresh.
- Show All-Day Events: Enable this option to display all-day events.
- Booking via Display: Enable this option to allow ad hoc bookings directly from the display.
- Meeting Confirmations: Enable this option to require bookings to be confirmed before the meeting starts.
- Confirm Meeting Start (Before): Used together with Meeting Confirmations. Select how long before the meeting the booking must be confirmed.
- Allow Early End: Enable this option to allow meetings to be ended before their scheduled end time.
- Additional Touch Functionality: Enables additional touch interactions. The available functionality depends on the selected design.
- Time Zone: Select the display's time zone.
- Language: Select the display's language.
- Phone Country Code: Specify the appropriate country calling code.
- Network Group: For enhanced security, you can configure IP filtering. Network groups can be managed from the Administration menu.
5. Save & Close
One you have selected a design, linked a calendar, named the display, entered a heading, and optionally configured the advanced settings, the display setup is complete.
Click Save & Close.
The meeting room display will now appear in the list of connected devices.